Originally published on snowball.digital

Setting up continuous integration pipelines for your frontend project can help you avoid bugs & filter out problems sneaking into production.
Having CI/CD in your frontend project from the beginning can help in avoiding “broken windows“ in your project (ref: broken window theory).
Additionally, setting up the workflow can help significantly improve developer experience (DX) & user experience (UX).
A pipeline that is setup early on in the project can help the team work with a unified purpose & set guidelines.
Plot
This article demonstrates a continuous integration pipeline setup for a starter Next.js app deployed on Vercel living on a Github repository. The pipeline makes use open-source Github actions from the Github marketplace.
The CI jobs runs synchronously. If a job fails, the process would exit.
- Linting (eslint + stylelint) - Helps with consistent DX
- Vercel deployment
- Lighthouse budget checks - Helps in UX integrity
Additional things you can do / add in your CI pipeline:
- Send slack notification if a job fails
- Run Cypress tests / Jest tests
- Setup semantic versioning / semantic release
If you find yourself using something else than the options I have chosen above. Here are some reasons why I have opinionated myself with the selected tools for this example:
Why Next.js instead of Angular, Nuxt.js, etc?Next.js gives flexibility to statically generate a page and / or use server side rendering. Smaller overall bundle size helps in achieving better UX.Why Vercel instead of AWS Amplify or Netlify, etc?Deployment previews! Each PR generates a deployment preview URL. Makes it easy and efficient to run E2E tests or Lighthouse checks against a preview URL. Also since I’m using Next.js.Why Github actions instead of Gitlab or Bitbucket, etc?Ability to use and/or write open-source Github actions.
Getting started
In this example I’m setting up the CI pipeline for a boilerplate Next.js app.
npx create-next-appAfter setting up the app, I initialise the ESLint setup:
eslint —initESLint initialisation will take you through a set of questions and help you set up the correct lint rules for your project. It automatically generates the configuration file & installs the dependencies.
For linting styles, I mainly prefer using stylelint, helps in enforcing css / scss conventions & avoid errors for stylesheets. Equivalent to using ESLint for Javascript files. Read more about configuring stylelint for your frontend project.
Finally, add the lint check scripts inside the package.json file so we can set it up with our CI pipeline.
2. Creating the Github actions workflow
To write the Github actions, we need to create main.yml workflow file inside .github/workflows/
In this CI example we have 3 jobs in our workflow.
- Lint source code (ESLint + Stylelint)
- If no lint errors then -> deploy on Vercel
- If deploy build is successful then -> run performance check with Lighthouse
We get started by defining that the jobs should run whenever there is a PUSH event on any branch.
name: CI
on: [push]
Based on your use-case, you can also chose to have different events. Checkout the different events that trigger a workflow
3. Setup the linting job
jobs:
  lint:
    runs-on: ubuntu-latest
    steps:
      - name: Begin linting
        uses: actions/checkout@v2
        with:
          fetch-depth: 0

      - name: Use Node 12
        uses: actions/setup-node@v1
        with:
          node-version: 12.x

      - name: Use cached node_modules
        uses: actions/cache@v2
        with:
          path: node_modules
          key: nodeModules-${{ hashFiles('**/yarn.lock') }}
          restore-keys: |
            nodeModules-

      - name: Install dependencies
        run: yarn install --frozen-lockfile

      - name: Run ESLint
        run: yarn lint

      - name: Run stylelint
        run: yarn stylelint
This job checks if the code adheres to the lint rules. As you can see, the job checks for eslint or stylelint problems.
To improve the DX and catch these lint issues while developing, it’s best to setup your IDE with the respective plugins. Since I use VSCode, here are the eslint and stylelint plugins that I use. I also like to set up the format on save in the VSCode settings.json file to automatically fix all fixable problems when I hit save.
4. Generate deployment previews with Vercel
deploy:
    runs-on: ubuntu-latest
    needs: lint
    steps:
      - uses: actions/checkout@v2
      - uses: amondnet/vercel-action@v20
        id: vercel-deployment
        with:
          github-token: ${{ secrets.GH_TOKEN }}
          vercel-token: ${{ secrets.VERCEL_TOKEN }}
          vercel-org-id: ${{ secrets.ORG_ID}}
          vercel-project-id: ${{ secrets.PROJECT_ID}}
          vercel-project-name: 'nextjs-tooling'
    outputs:
      preview-url: ${{ steps.vercel-deployment.outputs.preview-url }}
This job makes the use of the opensource GitHub action: Vercel actions The opensource action makes it easy for us to generate Vercel deployments, whether they are preview deployments or production deployments.
Here, we are also checking if the production build succeeds or not since we are making a deployment.
Using this action in the CI pipeline is better than setting up the Vercel for Github Integration, since the Github integration is asynchronous and runs independently of the pipeline state.
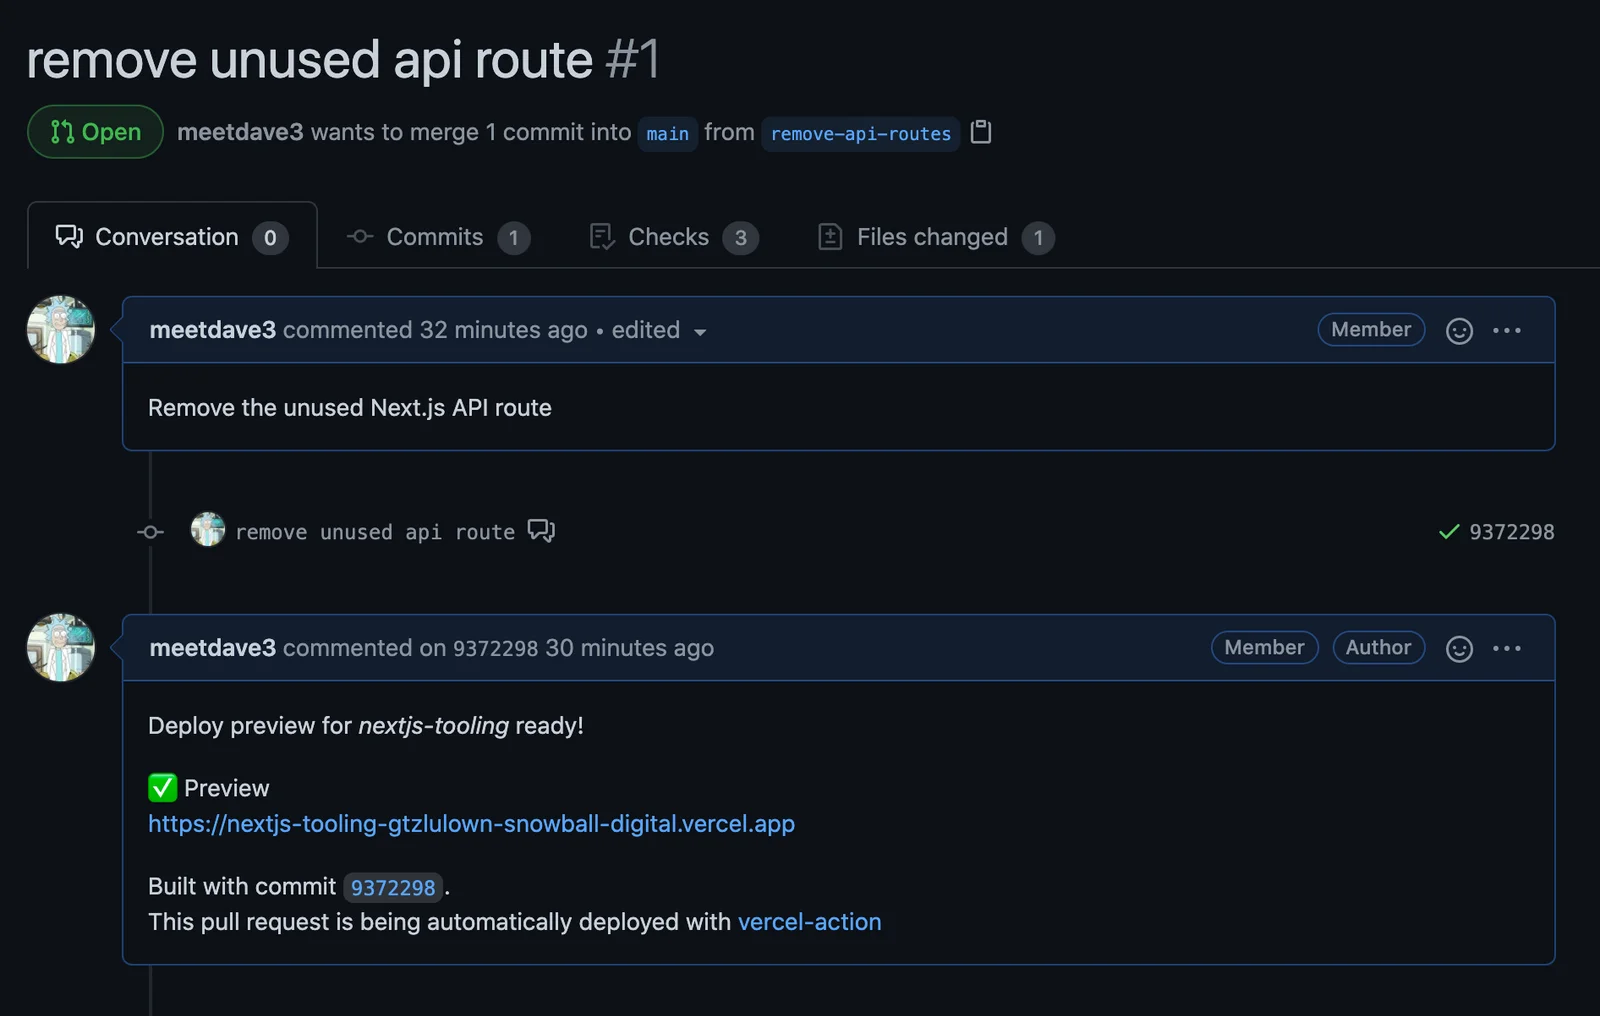
Checkout the Vercel actions documentation on how to setup the secrets. Once the deployment is done, Vercel generates a preview-url.
You may chose to run Cypress tests against the preview-url. In this article, we will be setting up the Lighthouse job which will make use of this preview-url.
5. Run Lighthouse budget checks against the deployment previews
lighthouse:
    runs-on: ubuntu-latest
    needs: deploy
    steps:
      - uses: actions/checkout@v2
      - name: Run Lighthouse on urls and validate with lighthouserc
        uses: treosh/lighthouse-ci-action@v7
        with:
          urls: |
            ${{ needs.deploy.outputs.preview-url }}
            ${{ needs.deploy.outputs.preview-url }}/some-other-path
          budgetPath: ./budget.json
          runs: 3
This job makes use of the opensource treosh/lighthouse-ci-action Github action. The action makes use of the Lighthouse CI and audits our deployments. The action allows us to set numerous options like
- testing against multiple paths
- providing a budget path
- number of runs (how many times the CI should audit an URL?)
- and many more ..
In this job, setting up a budget is the most important task. As you may have known, with the Google page experience update coming up in May 2021, Lighthouse scores and page speed performance are going to be prioritised in search rankings.
Therefore, setting up this Github action would help immensely for websites that rely on Google search traffic. If not taken care of in the early stage, it’s quite normal for the bundle sizes to bloat up as a website is iterated, then that results in a lower lighthouse score. This Lighthouse Github action helps us keep an eye on any discrepancy in every commit.
Based on your project, it can also be important to setup a correct Lighthouse budget. The budget for the example repo is: https://github.com/snowballdigital/nextjs-tooling/blob/main/budget.json
6. CI in Action
Working Github repo: https://github.com/snowballdigital/nextjs-tooling
Now we have all 3 jobs setup in the CI pipeline, on each push to a branch the following 3 jobs would run like so:
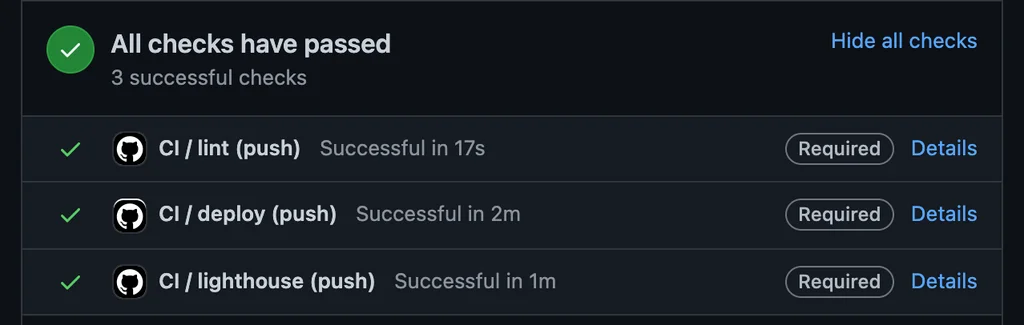
Additionally, if there is a PR, vercel-actions will comment on the PR once the preview URL is deployed successfully.
In conclusion
Simply, any commit which violates your CI rules will not make it to production.
These pipelines setup are best suited for any frontend project since the successful pipelines give you that the extra finesse and assurance to deliver a solid, consistent end user experience & also an improved developer experience for your team & co-contributors.